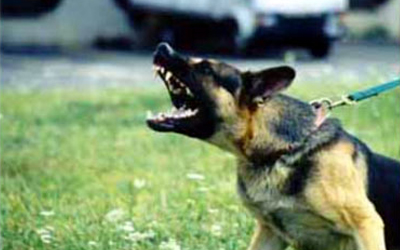
Problem-Solving in Training the Police Bark and Hold
This article was done in conjunction with a video I produced on Training the Bark and Hold for Police Service Dogs. That video takes you through all the training steps to train the bark and Hold (B&H). This article deals only with a small portion of what I cover in the video.
It would be nice to say that every dog can go through the fight drive training and come out of it doing a perfect hold and bark but that is far from the case.
There are a certain number of older, hard, tough dogs that are dirty and just go in and bite even after we do the Fight Drive (FD) training. These dogs need additional control training.
What about the dogs that go in and bite once and then back off on a B&H? These dogs need special work.
There is a range of problems that face handlers when they have a dog that will not do a bark and hold. But there is also a range of things that can be used on these dogs depending on the severity of the problem. To simplify this procedure for the new handler, I have arranged these options in a series of steps.
As we progress up the list of problems, the severity of corrections often goes up. It is up to the trainer to evaluate the temperament of his or her dog and determine what level of correction his dog needs. Some dogs' temperaments limit the severity of corrections. By that, I mean that a level 5 correction works on one dog whereas a level 15 needs to be used on another dog just to get the second dog's attention. Knowing what level to use is a factor of experience and testing.
The Training Process
I will briefly identify and describe each step and then go back and discuss the training in more detail. This will make it easier to understand.
-
The first thing that needs to be tried is a voice command of "Down" or "Platz" as the dog is approaching the helper. This gives the dog something to do when he gets there. With some dogs that are very obedient, that is all that is necessary.
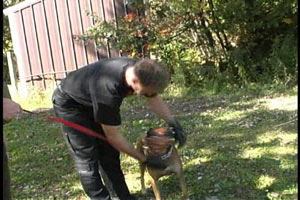
The handler needs to be standing near his dog when he gives the command, not back from where the dog is sent. If a dog does not respond to the voice command, the dog is not rewarded with a fight. The sleeve goes dead and the handler picks up his dog. A second handler holds the dog on a leash and releases it the second time. Just as the dog goes in for a bite, the dog's handler administers a correction. This can vary from simply blocking the dog, to using a throw chain or slapping the muzzle off the sleeve.
It's important to understand that this is only used for a short period of time. As soon as we see the behavior change, we eliminate this technique. Otherwise, we will see a dog that relies on the handler's interaction in the bark and hold. That's not what we want.
-
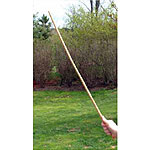
The stick is the next choice to correct a dog and help stimulate a bark. When a novice uses a stick correction it should come across the front legs. The effect on the dog is similar to you getting hit on the funny bone.
Experienced helpers can use a stick between the ears. This is used to put the dog into avoidance and make him back off on a bite. This should only be used on tough dogs with tons of fight drive.
These stick corrections can also be accompanied by voice corrections from the handler.
-
If a stick correction cannot get the dog to release, there is a serious conflict in that dog; this is a dog that has had poor foundational training.
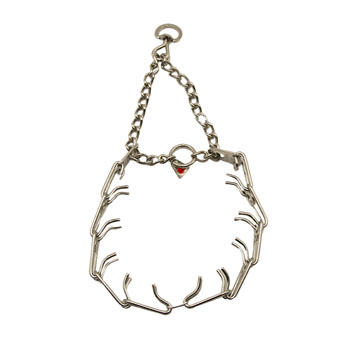
These dogs need to have their training backed up. They should be placed in a prong collar on a back tie and worked.
- The next step is the long line being handled by the handler or better yet a second assistant. The dog is worked on a prong collar and just like the back tie. We expect to see him slack off the pressure on the line before he gets his bite.
- When the dog is doing this well, he is sent to the helper dragging the long line on the ground as a reminder that he had better perform properly or he will be corrected with the line.
- The next level is two long lines attached to the dog. One is to a back tie while a helper handles the second. If a dog reaches this level, he must be forced to do a down and bark. Dogs that require the two-line work are very strong dogs. The down is the best way to maintain off-leash control on these dogs. The dog learns that he must perform properly or it will get a very strong correction from the second handler.
-
If a handler has a dog that has tons of drive and has been out of control for a long period of time, then this dog is going to have to be worked with an electric shock collar. This work is not for the average trainer. It needs to be done by an expert and the training for the collar can be a book in itself. There are simply too many steps that a dog must go through to explain here. But I will say that the dog needs to go back to step one in training with the collar being used in each step for it to be effective.
To put a collar on a dog and fry him when he is dirty will only confuse the dog and create other problems.
An In-Depth View of Each Step
Now let's go back and talk in more detail about some of these steps to control:
-
The voice command is most effective when the handler is standing up near the helper when the dog is sent. Usually, a handler's assistant releases the dog or if the obedience is good it's put in a "down/ stay" while the handler moves up.
The voice command comes before the dog reaches the helper. It does not come after he reaches the dog and is already biting. It is too late then.
Another way is to have the handler hiding near the helper and as the dog approaches, step out and command the dog to bark.
During this work, if a dog breaks through and bites, he receives a firm correction and is taken back and sent again. He is not corrected, made to bark, and then given a bite. He is corrected, taken back to the point he was sent from, and then sent again.
This method can only be used a couple of times. It's only used long enough to change the dog's behavior and then it's eliminated. The dog needs to be weaned off it as soon as possible, or it begins to rely on the handler to tell him what to do, and we don't want that in the find and bark. To be effective, the correction from the handler needs to be very firm. The dog needs to know that this is unacceptable behavior.
From a handling standpoint, don't forget to praise your dog for doing a good bark. If your command to search and bark is FORAN - then the praise is "good foran" every single time he does it right for the rest of his life.
-
The next level of control is stick corrections.
Some trainers will say, "I don't want the helper correcting my dog." These trainers don't understand the concept of fight drive training well enough. They are missing the fact that the helper must be viewed by the dog as a fighting partner. When the stick is used properly, the younger dogs see the stick hit as a little pain that comes from their fighting partner. They don't look at it as a correction for being disobedient.
When we deal with old, tough dogs that are just powering through to bite even though they know what to do - well that's a different story. Here the stick is used as a correction to put the dog into avoidance - we want him to back off the bite and many times good solid stick hits will accomplish this.
The idea with these older dogs is that they must learn that they need to be 100% obedient if they are going to get to bite. If they are not, they will be firmly corrected until they do it right.
The flip side of the coin is that there are dogs that could never tolerate a strong stick hit. If a helper makes a mistake and uses a stick on the head of a dog that is not strong enough to accept it, he can really create problems with that dog. It takes experience to know who can and who cannot take these kinds of hits.
The important thing for handlers and trainers to remember is that we must provide an avenue of learning when we have dogs with problems like we are talking about here.
That avenue is this, "If they do their bark properly, we are not going to make them bark all day. We are going to make them bark one, two, three, four, times before they get a fight."
By keeping the barking short, we help the light bulb go off in their head. They realize that I only need to bark a little and I am going to get what I want and it's easier to do it that way than to deal with these stick hits and corrections.
-
If we can't get a dog under control with a good helper and stick corrections, we are entering the area of serious dog training problems. At that point, it is time to back up the training. Take the dog and put him on a back tie and teach him again (or maybe for the first time) that he must exert some self-control before he is going to get a fight.
These dogs are almost always the more mature, tough dogs with these kinds of control problems. The issue with this training is obedience and not bite work. The dogs must learn to be 100% obedient and bark or they will be corrected with the stick.
The key to the bite is the dog backs off the back tie and lets the line get a little slack before he is given a bite. This indicates that he is showing self-restraint before he gets his bite.
The helper needs to have some patience here. If the dog continues to lunge and jump into the end of the line, then the helper must stand there. He does not offer a bite until the moment the back tie goes slack and the dog backs off and barks.
As the helper sees the dog learning, he can add stimulation to the dog to raise the dog's drive level and still force the dog to back off and bark. This added level of distraction (the additional stimulation) forces the dog to maintain control of himself in more difficult circumstances.
In the back tie work the helper initially only expects a few barks just as we do off-leash, but the helper can force the stronger dogs to show more control and more barking as the training progresses.
Don't be surprised if this emphasis on obedience takes some of the fight drive out of the dog or if the grips get weaker for a while. This is normal. After you get the control, you can always go back to some fight drive training.
The next level of control is work on the long line. Here the dog is sent in to do a bark and we have a setup similar to what we had when we worked the dogs on the voice command.
The handler is not the person that controls the long line; a second handler does that work. The dog's handler stands off to one side and slightly back from his dog. The key to long-line work is an automatic correction for the dog before he gets the helper. It's the line handler's mistake if the dog breaks through and gets a bite. This should never happen.
At some point, we are going to say okay, let's not give an automatic correction. Let's see if the dog will stop and bark on his own."
If the dog goes in and bites, you have made a mistake and need to back up the training. In this case, the correct training is to repeat the exercise a number of times (at least three times with automatic corrections) before you test it without a correction.
If you have another mistake when you test, I would again redo the exercise three times with automatic corrections. Once the dog performs properly, he should do it 3 times with a dragline before he is tested with no line at all.
-
If you are around enough dogs, it is only a matter of time before you run into a dog with serious control problems. These dogs did not develop these problems overnight. They developed them over a long period of time and were a result of a lot of poor dog training. Usually, the handlers who have these dogs are not the people that created the problems, so it's not their fault. These problems are often the reason the dogs were sold to police departments in the first place.
These dogs usually have a range of problems. There can be bark and hold problems, out problems, and/or too much fight drive which can create other obedience problems. The approach to take is to back up the training and work on one thing at a time.
First, we go to the back tie, then the long line. Often these dogs will work fine here, but as soon as the line is allowed to be dragged to the helper, they revert back to their out-of-control situation.
At that point, we introduce some drastic measures. We go to 2 long lines. Both lines are attached to 2 prong collars on the dog. One line is attached to a post and an assistant handles the other. The handler stands off to one side and just gives commands.
-
These dogs don't have fight drive problems. Usually, the opposite is true. They have too much fight drive. So we are essentially dealing with an obedience problem.
When the dog is disobedient, the slack is taken out of the lines and the dog is strung out. It's best that experienced trainers do this work. This is not something a novice should ever attempt. If a judgment mistake is made and this work is done on a dog whose temperament is not strong enough to deal with, you could create enough stress to ruin your dog.
For that reason, I strongly suggest you view my DVD on Training the Bark and Hold for Police Service Dogs. In the video, we show how to do this work in a step-by-step fashion and you will see how strong a dog needs to be before we attempt this training step.
-
The last option for control is with an electric shock collar. I hesitated to put anything in this article about electric collar work. As I mentioned earlier, electric collar work is only for skilled trainers that are adept at reading temperament in a dog.
The training steps for electric collar work should be a book in itself.
I will tell you this: the trainer that puts a collar on a dog and goes out and shocks it off a sleeve when it's dirty has just created a problem with his dog that he probably will not be able to recover from.
So I would once again caution new handlers that have strong tough dogs to be careful with electric collar work. Make sure you have an experienced mentor to help you with this training.
The thing about these types of dogs is that they don't belong in the hands of a beginner. I will almost guarantee you that if you have a dog with this level of fight drive. It is imperative you understand temperament. I say temperament because if the handler misjudges his dog's temperament and tries to crank the wrong dog around, he will be choking the dog off his own arm.
-
The Circle and Bark is born out of defense and avoidance of the stick. The concept is that if you engage the man you, disengage him when he stops moving. The dog must then go back to circling and barking. It was born from a desire to save dogs and save officers. The control out of the Circle and Bark is to down the dog. The problem new handlers have is, they chase their dog around the circle trying to get control of them rather than stand outside the circle and wait for the dog to come to them.
The most effective way to maintain control in the Circle and Bark is to never let the dog bite out of the circle. When the time comes for the bite, the handler "downs" his dog and goes to him. The helper runs and the dog is sent for a bite. If the dog is never allowed to bite unless the helper is fleeing, he is less likely to get dirty in the exercise.
A Typical Training Session
Let me quickly run through a typical daily training session for the hold and bark:
-
The dog is started on a back tie
- if it's a young dog, the focus is on fight drive/prey guarding
- if it's an older dog, the focus is on obedience in the bark
-
The dog is sent to the helper
- either on a long line
- dragging the line
- off-leash
-
If the bark is good the helper gives a bite
- if the dog bites the helper does not fight the dog at all
- the helper corrects the dog with the stick
- the dog is taken back and sent 3 times on a line with 3 automatic corrections - he gets a bite after barking
- If the dog does well, he is tested off the line - if not, don't test
-
Send the dog after the helper on a packing command or a bite command
- if the out is correct - out the dog off the sleeve - the helper will then drop the sleeve and then work the dog civilly.
- if the dog has out problems - slip the sleeve - we don't want to try and train a hold and bark while we correct problems with an OUT - this just causes stress and conflict in the dog. If a dog has outed properly, out the dog off the sleeve after it's slipped and then work the dog civilly.
- Put the dog away.
Now there are many variations to the training - the daily training will change according to what is going on with the dog - but if new trainers follow this type of routine, you will not make many serious mistakes with your training program.
When your dog can do good Hold and Barks on the training field it is time to start to add distractions through scenario training. That's the subject of a different article.


Most Popular Articles
-
01
-
02
-
03
-
04
-
05
Related Products
-
 $2.50
$2.50 -
 $46.96 - $81.62
 -

$289.99 - $419.99
$269.99 - $389.99

0 Comments
Ask Cindy
Sorry, adding comments is currently disabled.